
I used to have difficulty remembering a long list of items until I learnt the technique of using images to store the data in my mind. Here’s a craft to visualize the creation story which the kids will remember forever.
Things you’ll need :
- Newspaper cuts: eight 12×8 cm sheets per child
- Satin Ribbon: 15-18cm long string per child
- Glue, Scissors, Sketch pens/crayons
(Optional)
- Colour papers: Black, yellow/golden, light blue
- Animal pictures: one animal per child
- Cotton
- Grass/ small flower/small leaves
- Cellophane tape
Preparation :
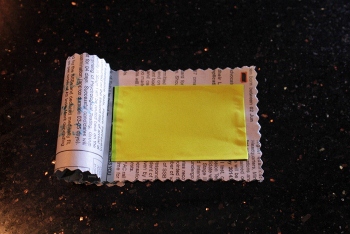
1) Cut eight newspaper pieces sized 12×8 cm. Be sure to use papers having at least one side without any images or colored text for 7 sheets. These will make the pages of our scrapbook. It will be great if you could find a light colored sheet for the cover. Not a big deal though if you can’t find a properly shaded cover sheet. Black and white will do.

2) Stack the eight sheets neatly with the colored sheet on top. Punch two holes on the left middle edge of the stacked sheet. ( The holes in your sheet needn’t necessarily be as perfect as mine because I have used a punching machine 😉 Any sharp object like the tip of a ballpoint pen will do ).

3) Tie the ribbon on to the stacked sheets through the holes and make a beautiful bow.

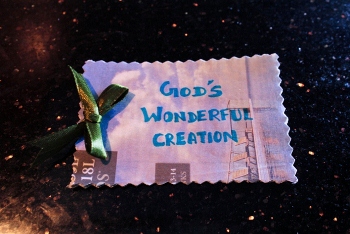
4) Design the cover page as you wish. Here’s my simple version
5) With a sketch pen/marker write down the numbers 1 to 7 on the top right corner in each sheet denoting the day of creation we would be portraying on that particular sheet.

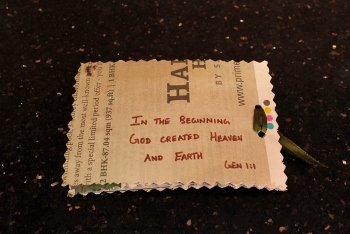
6) You can also write the Memory verse of the day on the back cover.
Now your basic scrapbook is ready. Depending on the materials you have and the difficulty level you want for the kids, you can customize the following strategy I have designed. Read along and when you do not have any item that I have mentioned or for any other reason you want to skip that particular step, feel free to innovate and incorporate your ideas 🙂
I am going to brief you on the preparation required for the strategy I have chosen to depict each day of the creation. We have to prepare the following for each kid 1) A detailed Scrapbook 2) A craft kit. I will be explaining how to go about the two simultaneously.
# DAY 1
- Cut a 9×6 cm sheet from the black colored paper and stick it on the day 1 page of the scrapbook with proper alignment.

- In like manner cut a 9×6 cm sheet from the yellow colored paper and add it to the craft kit.
# DAY 2
- Cut a 9×6 cm sheet from the blue colored paper and stick it on the day 2 page of the scrapbook with proper alignment.

- Take some cotton and add it to the craft kit.
# DAY 3
- While I’ve used real blades of grass here, you could always use a green colored paper too. Cut it into thin short strips and add it to the craft kit.

# DAY 4
- Cut a 4.5×6 cm sheet from the yellow colored paper. Cut one more sheet of the same size from black colored paper and stick them both side by side on the day 4 page of the scrapbook with proper alignment as shown.

- You can cut shapes of sun, moon, and stars and add it to the craft kit for this day or you can simply make the children draw themselves. If you are going to make the kids draw themselves make sure you used a blue color background for the night instead of black.
# DAY 5
- You can either cut a piece of a blue sheet as shown and stick it or simply draw the sea using a blue sketch pen /marker.

# DAY 6
- Cut a 9×6 cm sheet from a white paper and stick it on the day 6 page of the scrapbook with proper alignment.
- Using a brown sketch/marker draw some landscape and fill it with color.

- You can buy some animal pictures for each kid or you can make them draw the same. Depending on what you are going to do, update the craft kit if necessary.
# DAY 7
- Cut a 9×6 cm sheet from a white paper and stick it on the day 7 page of the scrapbook with proper alignment.

Now we are good to go. So you’ll be giving 2 items for each kid
1) Detailed scrapbook
2) Craft kit
- Day 1: Yellow 9×6 cm sheet
- Day 2: Little bit of cotton
- Day 3: Grass/ Green paper thin short strips
- Day 4 : (Optional) Sun, Moon and stars paper cutting
- Day 5 : –
- Day 6 : (Optional) Animal pictures
- Day 7 : –
Method
- Hand over the detailed scrapbook and craft kit to every kid.
- As you narrate the events of a particular day of creation, allow the kid to take out the required material from the craft kit and also keep the respective page open.
- Guide the kids to complete the activities as detailed below.
#1: God created the light
- Make the kids close their eyes tight and ask them what they see. (Their answer would be Nothing/darkness/black colour.. ). Point to them the dark sheet on page 1 of the scrapbook and explain to them that that was how the world was in the beginning.
- Make the kids take the yellow colored sheet from the day1 craft kit and stick it on top of the black sheet as you narrate how God spoke saying ‘Let there be light!’ and there it was.
#2 : God created the sky
- As you continue with day 2, let the kids take out small pieces of cotton and glue it to the blue sky you have already prepared for them in the scrapbook.

# 3: God created the plants
- Kids should make a bunch out of the grass blades you have provided and stick them to the glued side of the cellophane tape.

- Cut the cellophane and paste it on the day 3 of the scrapbook.

# 4: God created the Sun, Moon, and stars
- Make the kids paste the sun on the yellow side of the page on the scrapbook and the Moon and stars on the dark side of the page. God made the Sum to govern the day and the Moon and starts to govern the night.

- If you have enough time, you can make them add more details to the heavenly bodies.

# 5: God created the birds and the fishes
- Kids love drawing. Give them a chance to show their talent by drawing some birds and fishes.

# 6: God created the animals and made Man and Woman
- If you have got animal pictures, ask the kids to choose an animal of their choice and stick it on the land part of the page. Or you can make them draw any animal of their liking.
- Finally, end the creation of God with His masterpiece – The humans. Guide the children in drawing stick figures of Adam and Eve.

# 7: God rested
- God saw that all He had made was good and He rested. This day He made very special. Ask the kids which day it could be? (Their answer: I don’t know / Sunday)
- Tell the kids that even today this day is very special because it is a day we rest from our own work and spend time with God together with others. And so coming to church is very important.
- Let the kids write down on the last page of our scrapbook ‘God rested’.

Our ‘God’s wonderful creation’ scrapbook is completed.
SPECIAL NOTE TO THE TEACHER :
- This might seem like a heavy preparation for you. I agree it is. But it is worth it. When you prayerfully do it, God would use it as a blessing for the kids and yourself. In an age where various non-biblical theory is in every book, how will our children know who made all the natural things they see? Sow the truth while they are in your hands. As you meditate and prepare for this session you’ll understand how awesome God’s creation is! How mighty our God must be to create everything our eyes can and cannot see! Praise the Lord!
- I would highly recommend taking this teaching for kids in and above primary level. Beginner kids would still be unaware of the concept of creation. All they see exists just like that for them. It would not make much sense (in my opinion) teaching them how the world was created.
- Finishing the 7 days of the creation on a single day might be a little hard on the kids unless you have ample time for the session. So you can plan on taking 2 to 3 days per sessions. Well, that’s up to you anyways.
- Don’t forget to prepare your completed scrapbook beforehand. But make sure that the kids get to see only whichever day you are presently dealing with. The other days are kept as a suspense especially when you are planning on a series instead of a session.

Leave a comment